Let’s talk drill bits, their differences, and how to choose the right one for your work. There’s actually a lot that goes into the shape and function of those little suckers. To keep it all straight, we’ve put together a reasonably robust look at drill bit anatomy, common terms, types, and uses.

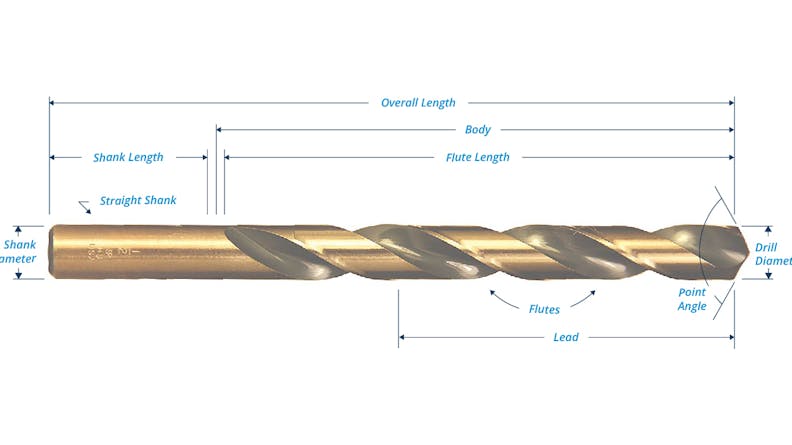
Overall Length (OAL) - This is the measurement from the base of the drill bit up to the cutting point.
Body - This definition may seem basic, but it actually only includes the length of the drill from the outer corner of the cutting lips just to the end of the flutes. In other words, the flute length, but slightly less.
Lead - The lead is the length of the actual cutting surface of the drill bit. This measurement is a tad shorter than the flute length.
Flute Length - This is basically the span of the flutes on the drill bit, from the leading edge of the cutting tip just to the end of where the flutes taper out.
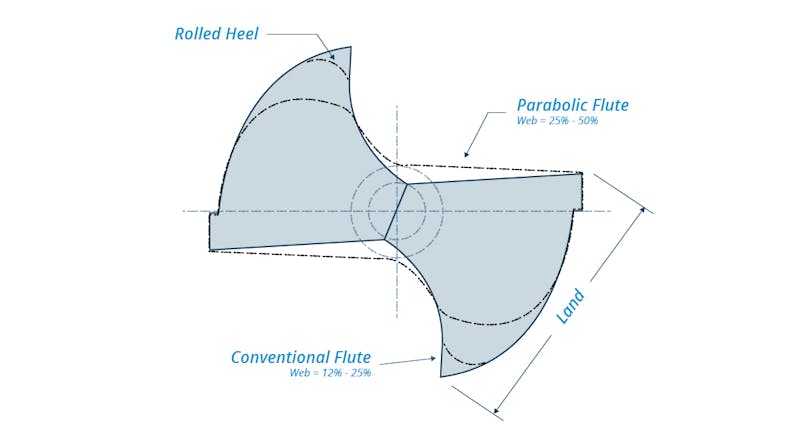
Flutes - Flutes are the sharp slots that corkscrew upwards along the length of a drill bit. They are responsible for doing the cutting work when the drill bit is spinning.
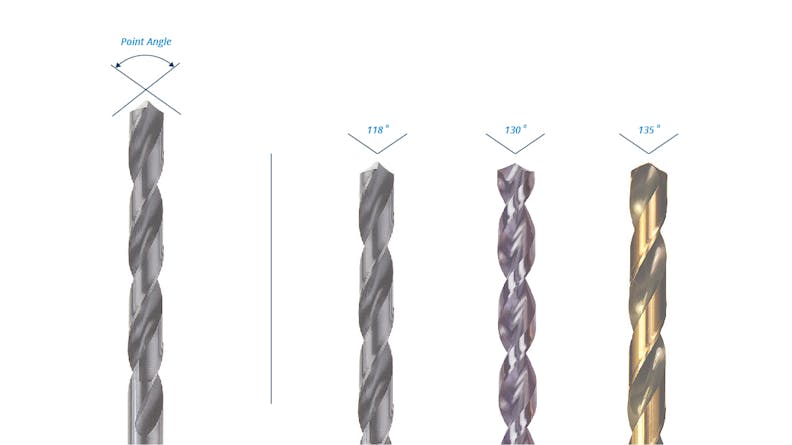
Point Angle - The point angle, or cutting angle, is the angle between two lips when it is projected onto a plane parallel to the axis. More simply, it is the angle between the lips in the side view of a twist drill. The typical value of the point angle is 118°.
Drill Diameter - This term is pretty self-explanatory.
Neck - The neck is between the shank and the flute. The neck allows space for chip evacuation and prevents the shank from rubbing during deep-pocket milling applications.
Shank - This is the non-cutting end of the tool that is held by the tool holder, or chuck.
Shank Diameter - The shank diameter is the width of the shank. This measurement is essential to note when buying or choosing a tool, so that you can be sure to pick the correct shank size for the tool holder being used. Shank diameters require tight tolerances and concentricity in order to fit properly into any holder.
Shank Length - You know… the length of the shank.
Drill Bit Length Type:
The drill length you need is dependent on the type of work you’re doing, including the material, your operation, and your tool. Choosing the correct drill length is really important if you don’t want to waste your time with broken tools.
Twist drill bits are the most common type of drill bit. They are used for everyday drilling in all types of material. They are the least expensive of the drill bits and are available in a metric ton of size, tip, and material specifications (we’re kidding, who uses metric?)*.
Basically, a shorter drill bit is stronger and less likely to wander or break, but it may not have the reach needed for all jobs. Twist drill bits used in automated machinery have an actual length specification (e.g., 4-1/2”). However, most twist drills for portable drill use have a graduated length which distinguishes them from one another.
* We’re also kidding about the metric joke, jeez.
Length ranges for twist drills include:
Jobbers Length - These bad boys are the most common twist drills. They provide a pretty good compromise between length and strength, which makes them suitable for most general-purpose applications. Jobbers length drills vary in length according to their diameter and typically have a flute length of 9-14 times the cutting diameter.
Mechanics Length - Mechanics length drills are shorter than the average jobbers (hah). They are more suited to tighter spaces (less likely to break) but still allow a reasonable flute length.
Screw Machine Length - These drills are often called “stubby length” and are the shortest common drill bits. As the name suggests, these drill bits were initially designed for screw machines. They perform well in strength and allow a lot of added working clearance.
Extra Length - These are extra long drill bits (up to 18”) with flutes extending the entire length of the drill bit. The extra length makes them more fragile than a shorter length drill bit, and therefore they are more easily broken. Because of this, it’s usually best to drill as deep as possible with a jobbers length (or shorter) drill bit before finishing the job with an extra length drill bit.
Aircraft Extension - While these drill bits are similar in length to extra length drill bits, aircraft extension drill bits prioritize reach over cutting depth with a flute length more similar to that of a jobbers drill. This ratio makes the drill bit much stronger and less likely to bend and break. As the name suggests, these long fellows were developed for use in the aircraft industry, likely around WWII times.
Silver and Deming - Named after a company based in Salem, Ohio, Silver and Deming drill bits are defined by more than just length. These bits are 6” long with a 3” flute length and a 1/2” diameter shank. All Silver and Deming bits are over 1/2” cutting diameter, ranging from 33/64” to 1-1/2”. They are designed for use in a drill press.
FREE Product Development E-Book
Drill Bit Tip Styles:
The right drill bit tip style is determined mainly by your work material. This is an important choice for a clean job without walking, slipping, or other common drill bit shenanigans.
Conventional Drill Points are the most common tip style for general purpose drills, and usually have a tip angle of 118°. These drills are great for a range of material applications, including wood, non-ferrous metals, and mild steel. Conventional drill point drills are relatively inexpensive and are easily re-sharpened. It is worth noting that if you sharpen your drill bits, you run the risk of ruining their protective coating. Kind of a downer depending on your use type.

General-purpose drill points are often 118° angled drills, which are typically used for cutting into soft metals such as aluminum. The 135° variant of this drill bit is best suited for harder materials like stainless steel. A 135° drill is flatter than 118°, meaning more of its cutting edges engage with the material surface sooner in the drilling process.
A Split Point Drill is an advanced drill point that does a great job preventing any walking your drill bit might want to do, and overall provides improved penetration with less effort. Available in 118° or 135° degree angles, split point drill bits are better for drilling curved surfaces or in alloy steels. These puppies are more expensive and more difficult to re-sharpen.
Taper Point drill bits have a very large taper, extending far up the drill. This style creates a tapered hole which is generally used as the pilot hole for an old fashioned wood screw (if you’re into that).

Flute Styles:
Your tool type (read: speed and feed), material type, operation type, and the drilling depth you’re after are the most important factors for choosing a flute style.

Most twist drills have flutes that expel the chips at an unspecified angle and are pretty suitable for most applications. When you need something a bit (puns, amirite?) more specific, there are a range of other specialty twist drills. For example, drill bits designated as “High Helix,” “Fast Spiral,” “Low Helix,” and “Slow Spiral” are all designed for specific applications requiring higher or lower spindle speeds or feed rates. These guys are pretty much only good at their specific jobs, though, so don’t mess around.
Shank Styles:
Shank style has to do with the shape of the shank, and there are many styles to choose from. The tool you’re using is the main determining factor here, though you do have some leeway for preference.
Twist drill bits created for use in automated machinery have fixed diameter shanks (usually 1/2” or 10mm), threaded shanks, or fancy-schmancy shank styles designed for specific machines. General-purpose twist drill bits used in portable drills have shanks the same diameter as the drill bit size (up to a certain diameter, at least). Larger diameter drill bits have a smaller shank (either 1/4”, 3/8” or 1/2”) so they can fit into a standard, regular-joe-sized drill chuck.
Some drill bits have 3 flats on the shank to keep them from slipping all over the place under high torque loads. Still, others have 1/4” hex shanks for use in a portable drill with a hex drill bit holder. Hex shanks are better on harder materials, but round drill shanks center more reliably.
Choose the shank style you need carefully, by taking note of the tool you’re using (including the drill chuck), the material, and what you’re trying to do.
Drill Bit Coatings:
The finishes applied to your drill bit are major players in its effectiveness and longevity. There are a number of different protective coatings up for grabs. General-purpose drill bits are usually available with black oxide, bronze oxide, a combination of black and bronze oxide, and TiN coatings. Twist drills for automated machinery on our site are primarily used for wood or plastics machining, and are not coated.
We know we didn’t cover every type and category here, so don’t bust our bits if we’re missing something. Basically, when you’re choosing a drill bit for your upcoming project, take into close consideration the drill length, tip style, flute style, and coating that will best fit your use case. Also consider your material, tool, drilling depth, machining situation, and personal preferences. These choices can not only determine whether your drill bit can complete the job, but also its performance over time.

