The cutting and engraving of medium-density fiberboard uses an X-Y scanned laser head to apply coherent laser light to a moving point, destroying and vaporizing the material that the light strikes. This process can run at high power and feed rates, to cut through the material in a process called laser cutting. Laser engraving, on the other hand, uses reduced power and finessed feed rates to partially cut into the material depth, removing material to generate 2D and 3D reliefs within the thickness.
The ideal laser settings such as power, speed, and focal length vary depending on several factors such as the type of MDF and the material thickness. For example, a laser cutter for MDF cutting utilizes at least 40 W of power from a CO2 laser. This allows single-pass cutting of 3 mm and 6 mm thicknesses and possibly requires multi-pass cutting for 12 mm and 18 mm MDF. For engraving, lower-power CO2 lasers can give excellent results, but they will likely be limited in their total single-pass cut depth. Optimum power and feed speed are also highly dependent on laser power for cutting.
Focal length is an important, variable parameter. Shorter focal length optics (around 38 mm) produce a very small-diameter spot on the material, for high resolution and power density, allowing very fast cutting. However, this is only suitable for very thin materials (up to 3 mm), as the divergence (i.e. the angle of the cone of light energy) is significant, and deeper cuts will not be parallel-sided. This article gives an overview of the techniques and equipment to get the best results in both MDF cutting and engraving.
How to Laser Cut and Engrave Extruded MDF
The cutting and engraving of MDF is a sequential process, in which each step must be right for the outcome to be of good quality:
- Find or create the design. Creating basic-cut designs can be achieved in 2D CAD with the most basic design packages. Engraving can be multi-layered, in which case designs benefit from a 3D CAD package (or a series of carefully overlaid 2D designs in which the depth of cut is manually controlled).
- Load sample material into your laser cutter and confirm that the settings are correct for a good-quality cut. Optimize the laser settings such as focal length of optics, laser power, feed rate, air assist, and extraction setups.
- Upload the cut/engrave design instructions from the design to the laser cutter.
- Place the actual part material onto the bed of the machine.
- Execute the cut or engrave program.
How to Laser Cut and Engrave Cast MDF
The steps in laser cutting and engraving cast MDF vary depending on the brand of the machine and MDF. It is therefore recommended to check the supplier or manufacturer’s instruction manual and material safety data sheet (MSDS). Listed below are the general recommendations for laser cutting and engraving cast MDF:
- MDF produces smoke in the cutting process which must be removed quickly, to avoid staining. Removal of the smoke requires air assistance and lenses/optics to be checked for contamination. Adequate extraction should be used, to clear the smoke quickly.
- Smoke from some brands of MDF can contain toxic formaldehyde released by the adhesive component. Selection of the adhesive grade is only practical in Europe and to a limited degree in the US, as production is highly regionalized and not all plants have switched to low-toxicity adhesives. Use of low- or zero-formaldehyde MDF is therefore recommended.
- MDF is sensitive to cut conditions. Excess power, lower feed rates, excessive single-cut depths, and mistaken setting of the focal length of the machine optics can all result in burned and badly stained cuts and extensive heat-affected zones (HAZ) beyond the cut. As a starting point for test cutting, be careful to set the focal length of the optics according to the manufacturer's specifications.
For more information, see our MDF Cutting Service page
The Differences Between General Part and Presentation Part Cutting for MDF
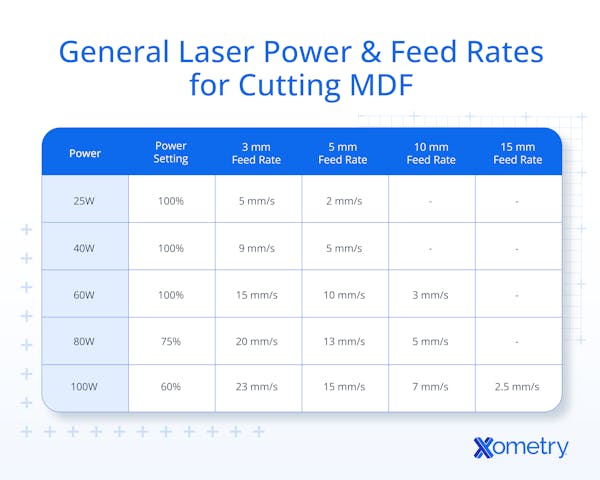
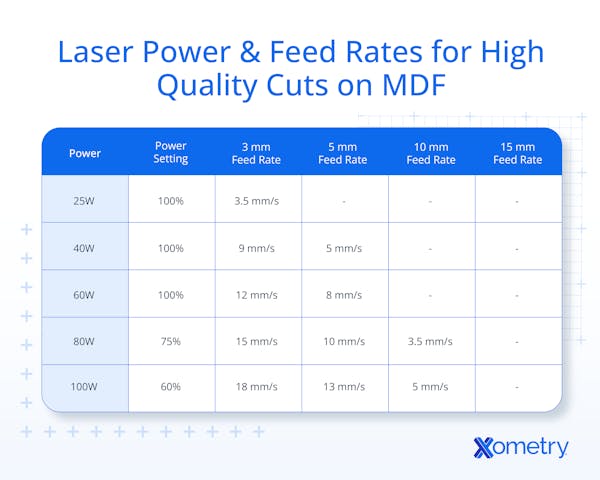
The difference between the general part and the presentation part cutting for MDF is the feed speed. General part feed rates are slightly (~25%) higher, to provide faster overall processing at the expense of some quality issues. There may be an increased HAZ, more blackening, and moderately higher flame risk. The presentation part cutting feeds more slowly to achieve more precise cutting and more time for air assist and extraction.
The Best Power to Use for General Part Cutting of MDF
Power settings for MDF are not clear-cut and straightforward. A few basic guidelines should help you set up your test samples to evaluate cut performance:
- Up to 60-watt peak power, lasers will need to be run at 100%.
- Scale back the pulse modulation to reduce the power, for a higher wattage.
- For higher power, more air assist and extraction will be required.
The Fastest Speed for Cutting MDF with Presentation Parts
There is no single fastest speed for presentation cutting, as it is dependent on laser power. On the basis of moderating the laser power to 60 W by pulse modulation, it is recommended to use a maximum cut rate of 18 mm/s on 3 mm-thick, cast MDF for presentation quality parts.
The Different Grades of MDF
There are three density grades of MDF: lightweight MDF, standard grade MDF, and high-density MDF. Light MDF is the lowest density and weakest form. It uses less fiber to form a typical 18 mm board, leaving more microvoids between fibers. Standard MDF, on the other hand, is the middle (and generally available) grade. High-density MDF (sometimes referred to as HDF) is denser and stronger.
There are also a number of grades, differentiated by one or more properties: Decorative surfaced (or veneered) MDF, Exterior MDF (MDF.E), Flame Retardant MDF, and Moisture resistant MDF (MDF.H and MDF.HLS).
The Best Setting for Laser Cutting MDF
Quality of cut in laser cutting MDF is a result of a balance between the upper kerf, lower kerf, the ratio of kerf widths, cut roughness, staining, expectations, and operating costs. These variables are affected by material density, adhesive, optics quality, laser power, and laser frequency.
Tables 1 and 2 below shows the suggested power settings and recommended feed rates for MDF laser cutting, for general parts and high-quality parts respectively.


Common Mistakes Made When Laser Cutting MDF
The common mistakes made when laser cutting are:
- Cutting with insufficient extraction: This can lead to surface staining.
- Making cuts when not enough air assist is used: The optics get coated, and laser power drops off during a cut.
- Cutting using too much laser power (or too slow a feed rate): This often results in an overheated cut, charring that blocks the cut, excess smoke, and a fire risk.
- Using too fast a feed rate: This can result in partial depth/incomplete cuts.
Best Beginner Tips When Laser Engraving MDF Sheets
The best tips for beginner MDF cutting are:
- Covering the whole surface will reduce smoke staining to a minimum without affecting cutting.
- Your machine will have preset settings for MDF engraving. These are good starting points.
- Don’t assume the presets will work perfectly; try some tests, note the results, and study the manufacturer’s evaluation/optimization process.
- Most machines have options for setting the sequence of cuts. But you can also arrange cuts into distinct layers, sequencing layers to order the cuts. Avoid alignment errors by putting all design aspects onto separate layers in one file, and turning layers on to cut them.
- Try to avoid double cutting a line.
- Raster engraving is slower, but better for complex shapes. Use vector engraving where you can, to reduce process times.
- To finish raster-engraved areas, add a vector outline to sharpen/crisp the edges.
The Best Laser Cutter for MDF
There are many options for MDF laser cutters that can handle MDF cutting and engraving, such as:
- OMTech DF0812-40BG 40 W Laser Engraver: This is a nicely laid out machine, with a full enclosure that makes potentially hazardous materials like MDF much safer. Though it has a relatively small cut area, at 12” x 8” it can handle deeper parts than typically possible, up to 2½”, which can be very useful.
- Glowforge Laser Cutter and Engraver: The Glowforge Laser Cutter and Engraver is a very professionally finished, fully enclosed machine. The highest-spec. version allows feed through, so a workpiece of up to 19½” in width, can effectively be of unlimited length (by being cut/engraved in stages).
- Ten-High Upgraded Version CO2: The Ten-High Upgraded Version CO2 is a higher-power machine that meets the needs of MDF cutting/engraving. Industrial looking and fully enclosed, it’s a robust and safe option.
What Are the MDF Projects for Laser Cutting?
There are several MDF projects that can be considered for laser cutting. Some examples are:
- Jigsaws.
- Picture frames.
- Kids’ mobiles.
- Coasters.
- Clocks.
- Complex 3D assemblies like boxes, skeleton models, and display stands.
- Deep and complex engravings, both as individual items and as decorative motifs on more complex products.
- Signage and logos.
- Racking and storage devices.
- Moving-part toys like rubber-band-powered cars and mechanical games.
Alternatives to MDF for Laser Cutting
There are several alternatives to MDF for laser cutting. For cosmetic reasons, or simply for variety, several materials can be used as alternatives:
- Natural wood boards.
- Plywood. Plywood for laser cutting should be selected from higher grades, for good results.
- Cosmetically-faced (veneer or plastic) composite boards.
- Acrylic and other plastics.
- Cardboard, foamboard, oriented fiberboards, and “hardboard”.
The Difference Between MDF and Plywood in Laser Cutting
The structures of MDF and plywood are very different, which leads to differences in cutting that cause various issues with laser-cut plywood parts. These differences are:
- MDF's internal features are very small; this leads to a very uniform cutting process that rarely exposes weaknesses or flaws of any significance. Small features in plywood can be fragile, as the material loses integrity at a small scale.
- MDF cannot crack and splinter after cutting, where plywood commonly does, because of local weakening due to grain faults, voids, and size of features.
- MDF is very consistent in structure, so each part of the cut is much like the last. Plywood can be more prone to burning and staining because of variations in the local structure such as knotty material (harder and more oily), internal air gaps, glue-filled spaces within the board, etc.
How Xometry Can Help
Xometry provides a wide range of manufacturing capabilities, including sheet cutting and other value-added services for all of your prototyping and production needs. Visit our website to learn more or to request a free, no-obligation quote.
Disclaimer
The content appearing on this webpage is for informational purposes only. Xometry makes no representation or warranty of any kind, be it expressed or implied, as to the accuracy, completeness, or validity of the information. Any performance parameters, geometric tolerances, specific design features, quality and types of materials, or processes should not be inferred to represent what will be delivered by third-party suppliers or manufacturers through Xometry’s network. Buyers seeking quotes for parts are responsible for defining the specific requirements for those parts. Please refer to our terms and conditions for more information.

