How To Export DXF Files From Onshape

Export DXF files from Onshape for sheet cutting


Introduction
In this guide, we will walk through the process of exporting a DXF file from an assembly within Onshape's design environment. Onshape has become an increasingly popular 3D design software package; Xometry even has its own Instant Pricing App for it. You can start using Onshape for free, and it can run in a desktop web browser without extra plugins or as an app for Android or iOS.
Xometry can make parts designed in Onshape using a range of manufacturing processes. In this guide, we will take a component from Onshape's "Hexapod" assembly example and generate a DXF file that will be ideal for our sheet cutting service.
Step by Step Instructions
First, start with an open project. For this guide, we will be using the "Sample - Hexapod" design by Onshape. This design is found by searching for it in the public design archive within Onshape's main screen.

Now that the design is open, we will need to make a copy of it before we can start making edits. You won't need to do this step if you are working from your design or already have editing rights.
To make an editable copy of the document, click on the button in the upper left that says "Make a copy to edit."

A dialog box will appear, which allows you to create a name for the copied document. Give the document a name, then click the "Create public document" button to create the new document. If you are subscribed to one of Onshape's paid plans, you will also have the option to set the document as private.

We now have a copy of the design, which we can modify. The base plate of the assembly is a great candidate for waterjet cutting, and this is the component we will focus on using to generate our DXF file.
Click the "Baseplate" tab to see an isolated view of the part.

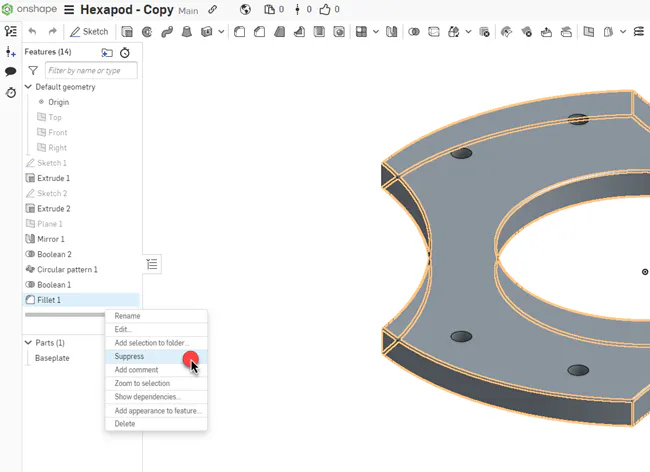
Currently, the baseplate has filleted edges. This wouldn't be an issue if we were planning to manufacture this part via CNC machining; however, since we are planning on generating a DXF for sheet cutting with this part, we will want to remove the fillets.
Remove the fillets by right-clicking on "Fillet 1" in the feature tree and selecting the "Suppress" option.
Now that the part has been optimized for DXF creation and sheet cutting manufacturing, we can begin exporting the DXF.
Select the top face of the part and right-click to open a menu. Select "Export as DXF/DWG..." from the options.

From here, a dialog box will open and present us with a few options for naming and exporting our file. We will select "DXF" for the format and "Download" as our export option in this scenario.
We recommend checking the "Export splines as polylines" and "Set z-height to zero and normals to positive" checkboxes to ensure the DXF file is correctly prepared for manufacturing.
Click "Export" to proceed and check your downloads for the newly created DXF file.

That's all there is to it. You can see how our DXF file turned out in the example below.
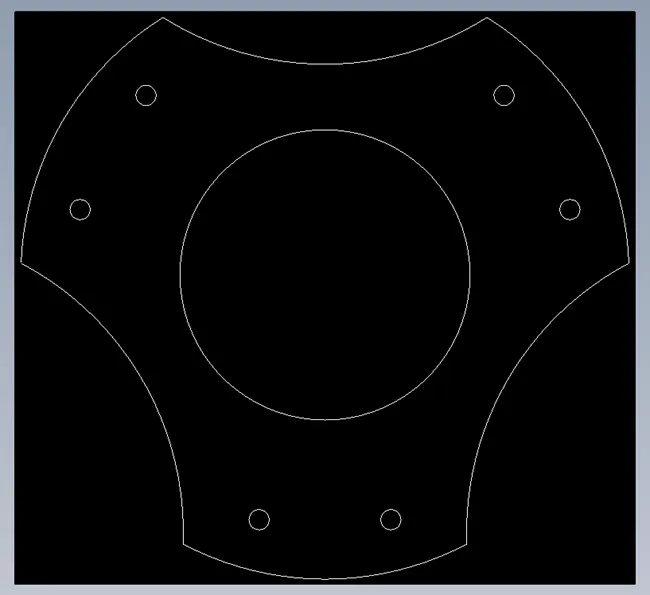
You can try out your DXF file by uploading it to the Xometry Instant Quoting Engine and start getting instant pricing from a variety of material and thickness options.


Conclusion
In summary, we were able to export a DXF file from Onshape by:
- Opening our design and isolating the target component.
- Removing non-applicable features such as edge fillets.
- Designating the face we wanted to generate a DXF from by selecting it.
- Exporting the DXF with appropriate settings.
Disclaimer
The content appearing on this webpage is for informational purposes only. Xometry makes no representation or warranty of any kind, be it expressed or implied, as to the accuracy, completeness, or validity of the information. Any performance parameters, geometric tolerances, specific design features, quality and types of materials, or processes should not be inferred to represent what will be delivered by third-party suppliers or manufacturers through Xometry’s network. Buyers seeking quotes for parts are responsible for defining the specific requirements for those parts. Please refer to our terms and conditions for more information.