How to Reduce CNC Machining Costs

When it comes to pricing CNC machined parts, the biggest cost driver is often machining time. This can outweigh the material costs, set-up costs, and even the costs of custom finishes, such as anodizing or plating.


When it comes to pricing CNC machined parts, the biggest cost driver is often machining time. This can outweigh the material costs, set-up costs and even the costs of custom finishes, such as anodizing or plating.
As a result, the secret to CNC machining cost reduction is cutting down on machining time wherever possible. One of the best ways to do this is through a process called design for manufacturing.
The more that engineers can optimize their designs to decrease cutting time, the more economical their parts become.
To help you save, here are ten CNC machining cost reduction tips that you can use on your next project.
Special thanks to Joseph H. Osborn, College of Marin Metals Technology, who helped provide content for this post.
Tip 1: Rounded Internal Corners
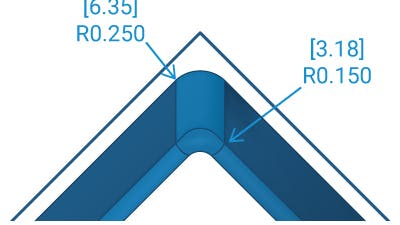
1. Rounded Internal Corners ≤ 3:1
A CNC machining tool – such as an end mill or milling cutter – will automatically leave rounded inside corners. The wider this radius, the less passes that the tool will need to make to remove material.
By contrast, a narrow inside corner radius requires both a small tool to machine away material and more passes — often at slower speeds to reduce the risk of deflection or tool breakage — resulting in more machining time.
For optimum design, use an inside corner radius that has a L:D ratio (length to diameter) of 3:1 or less. In addition, try to keep internal corner radii the same, if possible. This helps eliminate tool changes, which adds complexity and can increase run time significantly.
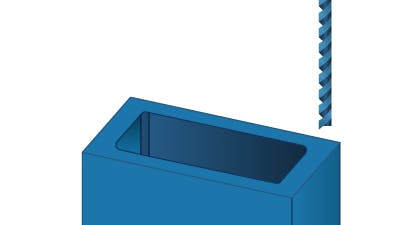
Tip 2: Avoid Deep Pockets
2. Avoid Deep Pockets
Parts with deep internal cavities are often time-consuming and expensive to manufacture.
The reason is that these designs call for fragile tools that are susceptible to breaking during machining.
To avoid this, either an end mill must be progressively “stepped down” in smaller and smaller increments to reach the desired specs, or other forms of machining, such as broaching or a wire EDM can be used; however, these can be just as costly.
As a best practice, we suggest parts with lengths up to 4X their depth. Anything greater than that becomes exponentially more expensive to manufacture.
Tip 3: Limit Use of Tight Tolerances
3. Limit Use of Tight Tolerances
Typically, only a few surfaces of a part are critical to its function. The more features with numerical callouts in the design (e.g., radii, hole diameters and chamfers), the more expensive a part becomes to manufacture.
In order to eliminate unnecessary costs, the key is to only assign numerical values to mission critical features and surfaces. Other, less significant features should be controlled by the model (standard tolerance of +/- 0.005″).
Also, try to define a single datum, like the intersection of two sides or the center of a hole, and then dimension everything else from this.
At Xometry, our typical tolerance accuracy ranges from 0.005″ – 0.001″, depending on customer specs.
Tip 4. Expand Thin Walls
4. Expand Thin Walls
CNC parts with thin walls have a tendency to chatter, which slows down machining speeds. They can also cause distortion, which makes it difficult to hold tolerances. The result can be additional costs.
In order to keep machining costs low, thin walls should have a minimum width of 1/32” (0.794mm).
If very thin walls are needed, it’s usually more economical to utilize other manufacturing methods, such as sheet metal fabrication.

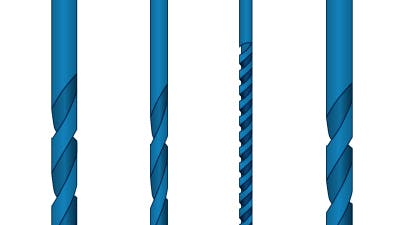
Tip 5. Optimize Tapped Holes
5. Optimize Tapped Holes
When it comes to tapped holes, two factors that can add cost are hole depth and tap size.
Typically, increasing the length of thread in a hole does little to hold the bolt tighter. It’s really just the first two or three turns that do all the work. As a result, you don’t need to thread a hole to more than 3X the hole’s diameter (and keep it shorter, if possible). Going deeper just increases the risk of tap breakage and adds time to the tapping operation.
In addition, utilizing standard tap sizes can help cut down on costs. For example, 4-40 taps are more common and generally available than 3-48 taps. In the same vein, avoid very small threaded holes, if possible. Anything smaller than a 2-56″ requires hand tapping, which adds significant time and risk to the process.
Tip 6: Leverage Standard Drill Sizes
6. Leverage Standard Drill Sizes
Keep hole sizes to standard fractional, number or letter drill sizes. That way, you won’t need end mills or reamers to finish the hole size to a non-standard dimension. This helps reduce machine time to keep costs down.
If you aren’t familiar with drill and end mill sizes, it’s safe to assume that conventional fractions of an inch, like 1/8”, 1/4”, or whole numbers of millimeters will be “standard.” Avoid using measurements like 0.492” or 3.841 mm.
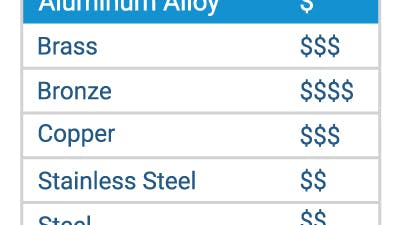
Tip 7: Use Less Expensive Materials
7. Use Less Expensive Materials
In general, softer metals are less expensive to machine than harder materials for a few reasons:
- In most instances, the raw material is more economical.
- Softer materials, e.g., aluminum 6061, cut more easily, which means less machining time.
- Harder materials require more expensive tools, and are more likely to break and wear tools, which can add to the project cost.
If a material like aluminum 6061 is too soft for your parts, look for a more machinable mild steel instead.
Tip 8: Avoid Multiple Finishes
8. Avoid Multiple Finishes
This applies to surface roughness or texture, and appearance-altering finishes like chem film, (sometimes called chromate,) or anodizing.
Mixing and matching adds a lot of cost. For example, requesting a mixture of anodized and chem film finishes on a part adds several processing steps. The same applies when specifying a smooth finish in one area and a bead blast finish elsewhere.
In terms of surface smoothness, it is best to either leave it open or request a uniform finish. If in doubt, it helps to explain the part’s function to your project manager.
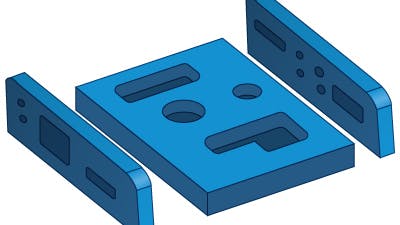
Tip 9: Split Up Complex Parts
9. Split Up Complex Parts
In some cases, complex parts would be less expensive if they’re designed and machined as separate parts, and then welded or bolted together afterward.
This is especially true for parts with deep pockets, which would require hours of machining time to remove material, plus additional material costs.
It’s also true for parts that require operations on multiple faces, which can add to fixturing and setup times.
Tip 10: Order Larger Quantities
10. Order Larger Quantities
Although modern CNC milling machines can combine multiple operations to run efficiently, they still need programming and setup.
Ordering multiple quantities of the same part helps generate production efficiencies and lower the cost per piece.
At the production phase (up to 10,000 parts), CNC machining can provide maximum cost-efficiency.