Pressure Die Casting: Types, Applications, Advantages, and Disadvantages


Everything you need to know about this useful manufacturing process


Pressure die casting is loved in manufacturing as it can quickly produce precise parts with consistent dimensions in high volumes. It allows for complex shapes with intricate details and thin walls, and the castings generally have a smooth surface straight out of the mold. It can handle tight tolerances, and produces much less waste than other similar methods. It’s compatible with a wide range of non-ferrous metals, and cost-effective when it comes to mass production.
We take a closer look at exactly how it works, the different types, and provide a step-by-step guide on how to do it.
What is Pressure Die Casting?
Pressure die casting is a type of die casting that involves using a metal mold that’s usually made from premium, heat-resistant steel grades, into which a non-ferrous metal like aluminum or zinc is injected. Basically, the mold cavity, or die, is machined into whichever shape is needed, and the molten metal is forced into it under pressure and high velocity.
The two main types of pressure die casting are low- (LPDC) and high-pressure (HPDC) die casting. LPDC requires the metal to be injected into the mold at low pressures, between around 2–15 psi, and takes a more controlled and gentle approach which takes longer because the inert gas pressure gently forces the alloy upwards into the mold. HPDC involves injecting the alloy into the mold at higher pressures, around 1,500–25,400 psi, is faster than LPDC, usually taking between 10 and 100 milliseconds to inject the alloy into the die through a high-speed ram. It’s better suited to extra high-volume production and parts that need to have very tight tolerances.
Apart from these, die casting in general can also be classified based on the type of chamber: hot or cold. Hot chamber die casting is where the metal is heated inside the casting machine. Many Xometry customers prefer this method when working with tin, magnesium, lead alloys, and other lower-melting-point metals. In cold chamber die casting, the metal is pre-heated in a furnace before being transferred into the casting machine. Our customers find that this method works perfectly with brass, copper, aluminum, and other metals with high melting points.
How Does Pressure Die Casting Work?
The pressure die casting process begins with an engineered closed steel die cavity, into which the molten metal is forcefully injected under pressure. This die is made out of two main parts, one moving, and one stationary, which are secured to the die casting machine’s platens. The machine itself has an injection mechanism on one end that uses both hydraulics and pressurized gas to propel a piston forward, and, on the other end, a clamping mechanism that uses hydraulics and mechanical toggles. The design ensures the machine can survive intense pressure during injection, and the die remains firmly closed as the metal part hardens. Impressively, this process can convert molten metal into a solid, near-net-shape part within just a few seconds. You can see all the different parts involved in the below diagram.
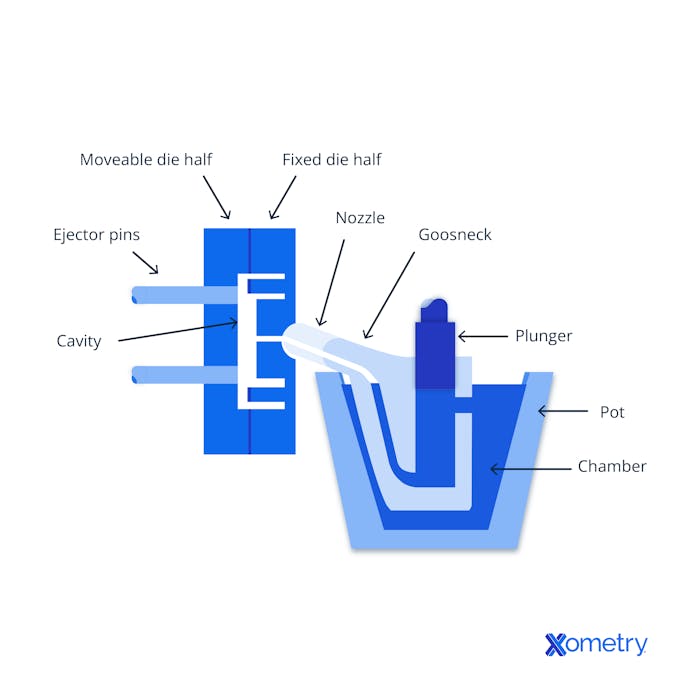
Pressure Die Casting Diagram
Non-ferrous metals are usually used for HPDC because they just fit the bill. Aluminum (particularly 380, 390, 412, 443, and 518) is a common go-to because it’s dimensionally stable, corrosion-resistant, electrically conductive, and able to withstand high temperatures. Compared to aluminum, zinc alloys (like Zamak 2, Zamak 3, and Zamak 5) they have a lower melting point, but they’re strong and ductile, and can be used with both hot and cold chamber die casting systems.
Magnesium is another option as it’s the lightest structural metal, highly machinable, and suitable for hot chamber die casting thanks to its lower melting point. Ideal for high strength-to-weight ratio applications, many Xometry customers prefer using magnesium (like AE42, AM60, AS41B, and AZ91D) for certain automotive and aerospace components. In addition to the aforementioned industries, these materials are also used in the pressure die casting process to make things like consumer electronics, and other decorative items that require intricate shapes or thin walls.
A few of the process’s downsides are its high initial cost and material limitations (it can only work with non-ferrous metals). There tend to be size limitations for cast parts, and it can be prone to porosity issues, cold shuts (where two fronts of molten metal meet but don’t fuse properly, creating a weak spot), and misruns which lead to incomplete castings or parts that are not fully formed. You may experience flash—excess thin layers of metal that escape and need trimming. This can be minimized, though, by clamping the mold halves tighter. Finally, it can create blisters—a type of gas porosity that looks like raised bubbles on the surface. If you try to minimize any trapped air further, you may be able to avoid this.
How Are the Dies Prepared With High-Pressure Die Casting?
Once you understand the geometry of your part, as well as its intended purpose, tolerances, and surface finish, you’ll want to think about which material you’re going to use. This will determine the melting temperature, shrinkage rate, and flow characteristics, among other things. Once all that’s done, CAD software is usually used to create the design and simulate things like the flow and solidification of the molten metal. You typically have complete control over a design within CAD software, and that will allow you to foresee any potential issues, and fix them before you even begin manufacturing.
Many of our customers who design molds using CAD software will carefully plan and include a gating system and a cooling system to keep the flow intact and free from gases, as well as regulate the temperature and allow the part to cool and solidify quickly. By taking their time with these steps, professionals can create molds that will stand the test of time and endure all sorts of use.
What Materials Are Used in the Process of High-Pressure Die Casting?
In the high-pressure die casting process, non-ferrous metals are predominantly used due to their excellent casting properties. The most commonly used materials in HPDC include:
- Aluminum Alloys: Aluminum is a popular pressure die casting alloy due to its inherent properties such as: being lightweight, offering dimensional stability, resisting corrosion, providing electrical conductivity, and withstanding high temperatures. Aluminum alloys are widely used in automotive, aerospace, and consumer electronics for parts like: engine components, frames, and housings. It exhibits excellent flow characteristics under high pressure when melted, yet necessitates a cold chamber system to yield high-quality castings. Commonly used aluminum alloy grades include: 380, 390, 412, 443, and 518.
- Zinc Alloys: Zinc alloys offer high strength, good ductility, and a lower melting point compared to aluminum. It is suitable for intricate shapes and thin walls in applications like: automotive components, complex gears, and decorative items. This material is compatible with both hot and cold chamber die casting systems. Widely used zinc alloys in high-pressure die casting processes are: Zamak 2, Zamak 3, and Zamak 5.
- Magnesium Alloys: Magnesium is the lightest structural metal, providing parts with the lowest weight. Magnesium also has high machinability and, due to its lower melting point, is suitable for hot chamber die casting. It is used in applications requiring high strength-to-weight ratios, such as automotive and aerospace components. Common alloys used include: AE42, AM60, AS41B, and AZ91D.
- Copper Alloys: Due to its tendency to crack, shrink, and develop porosity, pure copper is rarely used in die casting. Copper-based alloys such as: brass, bronze, and beryllium copper are more commonly employed in the die casting processes. These alloys are used for their excellent electrical conductivity, heat resistance, and corrosion resistance, suitable for electrical components, heat sinks, and other applications in which these properties are desired.
What Are the Types of Pressure Die Casting?
There are two types of pressure die casting: low-pressure die casting (LPDC) and high-pressure die casting (HPDC). Low-pressure die casting works with lower pressures, as the name suggests, and also functions with much lower speeds, whereas high-pressure die casting operates at significant speeds and pressures. Besides these classifications, pressure die casting, or die casting in general, can also be classified based on the chamber types:
- Hot Chamber: In hot chamber die casting the metal is heated inside the casting machine. It works best with lower-melting-point metals like: tin, magnesium, and lead alloys.
- Cold Chamber: Here, the metal is heated in a separate furnace and then transferred into the casting machine. This is ideal for metals with high melting points like: brass, copper, and aluminum.
Why Aluminum Is the Most Commonly Used Material in Pressure Die Casting?
Aluminum is the most commonly used material in pressure die casting due to its lightweight nature, excellent strength-to-weight ratio, good thermal and electrical conductivity, high corrosion resistance, and ability to withstand the highest temperatures of all the die cast alloys. Furthermore, aluminum alloys offer great dimensional stability and a wide range of surface-finishing options — more than other die cast alloys.
How Are Zinc and Magnesium Utilized in Die Casting?
Zinc and magnesium are key materials in die casting due to their specific advantages. Zinc is favored for its ability to capture intricate details and complex shapes because of its low melting point, making it perfect for small, detailed parts like gears and decorative items. It's also durable, offers great finishing options, and provides excellent corrosion resistance.
Magnesium, being the lightest die casting metal, is sought after in industries aiming to reduce weight, such as automotive and aerospace, to enhance fuel efficiency and performance. Its high strength-to-weight ratio and good mechanical properties make it ideal for producing strong, lightweight components. Magnesium, with its lower melting point, is used for hot chamber die casting, whereas zinc is compatible with both hot and cold chamber die casting.
What Are the Key Factors Affecting Mold Design of Pressure Die Casting?
There are some key factors that can affect the design of your mold:
- Shape, size, and complexity of part. The more complex the part, the more intricate mold features you’ll likely need, like cores, collapsible cores, or slides.
- Material properties. These include its melting temperature, fluidity, shrinkage rate, and thermal conductivity.
- Machine specs. Machine specs like clamping force, platen size, and injection system need to be compatible with the design of the mold.
- Mold material. This can impact the mold’s lifespan and performance. The goal is to find a material that can withstand high temperatures and pressures without degrading.
- Gate/runner system design. This will affect the flow of the molten metal, ultimately having an impact on the quality of the part.
- Cooling and heating channels. If you have the proper cooling and heating channels, this will help you control the mold temperature, which has a bearing on the solidification process and cycle times.
- Ejection system. The ejector system needs to be designed with the placement and number of ejector pins in mind. That way you can remove the cast part without damaging it or the mold.
- Adequate venting. Having adequate venting is very important if you are to make a high-quality part. Good venting will allow gases to escape, preventing defects. An overflow system can also capture any excess material.
- Desired surface finish. The surface finish you’ll eventually want will help you dictate the preparation of the mold’s surface, and help you decide which mold material and coatings to use.
- Tolerances and dimensional accuracy. By understanding these in advance, you can make sure that your cast parts meet specifications.
- Expected production volume. If you’re planning on making a ton of parts, you’ll quite obviously need to make sure the mold is durable enough to keep going.
How Does Wall Thickness Impact the Pressure Die Casting Process?
Wall thickness has a significant impact on the pressure die-casting process. Thinner walls mean the part can cool and solidify faster, leading to lower cycle times. It requires a lot of control over the injection pressure and speed to make sure the mold is completely filled and no defects arise. There’s also the danger of porosity or shrinkage because the interior will solidify slower than the exterior.
Additionally, having uneven wall thicknesses can cause another batch of problems, like warping or residual stresses in the final part because of the different cooling rates. That’s why we usually recommend balancing your wall thickness. It will increase your chances of producing a stronger part, with less material usage, part weight, and defects, and creating an all-around high-quality casting.
How Are the Molds for High Pressure Die Cast Designed?
The design process begins with a detailed analysis of the part geometry, including considerations for: the part's function, required tolerances, and surface finish. Material properties of the alloy to be cast, such as its melting temperature, shrinkage rate, and flow characteristics, are taken into account to determine mold features like: cooling channels, gating systems, and ejection mechanisms. CAD software is typically used to create precise mold designs, allowing for simulation of the molten metal flow and solidification before the mold is manufactured. The mold design also includes allowances for thermal expansion and shrinkage of the material during casting. Key components of the mold, such as: cores, slides, and inserts, are designed to create complex geometries and undercuts in the cast part.
The gating system is carefully planned to ensure efficient metal flow into the mold cavity while venting paths are included to allow gases to escape. This prevents porosity and other defects. Moreover, cooling systems within the mold are strategically placed to regulate the temperature, facilitating rapid cooling and solidification of the cast part. The durability of the mold is considered, and high-grade steels and surface treatments that can withstand the high pressures and temperatures of the die casting process for thousands of cycles are selected. The result is a robust, precision-engineered mold that ensures high-quality, consistent casting results.
How Are Pressure Die Casting Mold Maintained?
Maintaining pressure die casting molds is crucial to ensure their longevity and consistent quality of the cast parts. Regular maintenance practices involve thorough cleaning to remove any residual metal, lubricants, and debris, preventing mold damage and ensuring clean, precise casts. Visual inspections are conducted to identify wear or damage, such as: cracks, erosion, or thermal fatigue, which could compromise mold integrity. Critical components like: ejector pins, cores, and cooling channels require special attention to ensure they operate smoothly and efficiently. Lubrication of moving parts is essential to prevent sticking and wear. Additionally, periodic checks and calibrations are necessary to ensure the mold closes correctly, maintaining proper alignment and preventing flash. Molds are also treated with protective coatings and anti-rust agents during storage to safeguard against corrosion and environmental damage.
How Is the Pressure Die Casting Process Done?
To start the process, the die will need to be designed and manufactured using high-grade steel that’s suitable for the part’s flow, solidification, cooling, and other specs. Once assembled, the die has a release agent applied to it in order to prevent any of the molten metal from sticking to it and making removing the part a nightmare. You also have to preheat the die before casting to minimize any thermal shock and avoid any issues with the flow of the metal. The die is then ready to go into the casting machine, get aligned, and clamped in place. Lubrication and cooling systems are often integrated within the die to keep the temperature optimal and everything running smoothly.
After you’ve designed the mold, these are the steps to follow:
- Start by cleaning the two halves of the die and applying a release agent. If necessary, preheat the die.
- Heat the metal in a furnace until it reaches its melting point
- Transfer the molten metal to the injection system of the die-casting machine, using a piston to inject it into the die cavity at high speed and pressure. For low-pressure die casting, use lower speeds and pressures.
- Keep the pressure consistent until the metal has completely solidified and cooled
- Once nice and solid, separate the die halves, and remove the solidified part using ejector pins
- Use a trimming process to remove any excess material from the sprue, runners, gates, or flash
- If needed, this is the step where you’d carry out additional procedures to the casting like machining, painting, or assembly
- In this final step, you’d apply any finishing touches and make sure the part meets the standards you initially set out.
What Are the Effects of Pressure Variations on the Final Product?
Put simply, variations in pressure during the die-casting process will directly impact the final product, both in quality and in its characteristics. If the pressure is too low, the molten metal might not fully fill the mold, leading to parts that are incomplete or lacking detail on the surface. They could also come out weaker and less dense.
On the other hand, using too much pressure can cause the molten metal to infiltrate even the smallest crevices of the mold, leading to flash formation around the part—something you’ll need to spend time removing. Ultimately, using excessive pressure could make the mold wear and tear faster. That’s why choosing the right amount of pressure is really important.
What Are the Different Applications of Pressure Die Casting?
Some of the common applications of pressure die casting are listed below:
- Automotive components (engine blocks, gearbox cases, and wheel spacers).
- Consumer electronics (smartphone frames, connectors, and housings).
- Aerospace parts (actuators, gearbox components, and engine mounts).
- Lighting fixtures (lamp housings, reflectors, and heat sinks).
- Power tools (gearboxes, motor housings, and handles).
- Sporting goods (golf clubs, bicycle frames, and fishing-reel bodies).
- Industrial machinery (pumps, valves, and compressors).
- Electrical components (connectors, switchgear, and enclosures).
- Furniture hardware (handles, knobs, and frames).
What Are the Advantages of Pressure Die Casting?
Some of the benefits and advantages of pressure die casting include:
- Ideal for high-volume manufacturing.
- This process produces parts with high precision and consistent dimensions.
- It enables the casting of complex shapes with intricate details and thin walls.
- Castings have a smooth surface directly out of the mold.
- The process can achieve tight tolerances.
- It has less waste compared to other fabrication methods that involve material removal.
- A wide range of non-ferrous metals can be used, including: aluminum, zinc, magnesium, and copper alloys.
- It can produce large quantities of parts in a short time frame.
- While the initial setup and tooling costs can be high, the per-unit cost significantly decreases for large production runs, making it cost-effective for mass production.
- HPDC allows for the casting of extremely thin-walled components — as thin as 1 mm.
What Are the Disadvantages of Pressure Die Casting?
While there are several advantages associated with pressure die casting, it also has some drawbacks, such as:
- The initial costs for tooling and setting up pressure die casting operations are high due to the complexity and precision of the molds required.
- It’s prone to porosity issues. The rapid cooling and solidification can lead to porosity in the cast parts, which might affect their mechanical strength and integrity.
- Pressure die casting is generally limited to non-ferrous metals.
- There are size limitations for cast parts due to the constraints of the die casting machines and the pressure required to fill the mold.
What Are Common Issues With Pressure Die Casting?
Five of the most common issues with pressure die casting and their solutions are discussed below:
- Porosity: Porosity in solid cast metal parts manifests as holes or voids that can vary in size from microscopic to several cubic millimeters or larger. This defect primarily stems from two causes: solidification shrinkage and gas porosity. Solidification shrinkage happens as the injected molten metal cools too swiftly, contracting against the cooler mold walls. This contraction creates voids within the cooling molten metal away from the mold walls. On the other hand, gas porosity occurs when air or gas becomes trapped within the mold, leading to the formation of pockets. This can happen under several conditions, such as inadequate venting or improper mixing of materials during the mold-filling process. To mitigate these issues, manufacturers may adjust the mold design or casting procedures to promote uniform cooling, minimize shrinkage, or lessen the chance of air entrapment. The appropriate strategy is determined based on the underlying cause of the porosity.
- Cold Shuts: Cold shuts, also known as cold laps, occur when two fronts of molten metal flow meet but do not properly fuse, resulting in a weak spot or seam. This flaw often results from inadequate gating system design or insufficient molten material fluidity. To prevent cold shuts, manufacturers can: adjust the gating system, raise the pouring temperatures, or enhance the mold's ability to vent gases.
- Misruns: Caused by insufficient molten metal flow or premature solidification before the mold is fully filled, leading to incomplete castings or parts that are not fully formed. The solution here is similar to that of cold shuts. It involves reviewing and potentially modifying the design of the mold, the configuration of the gating system, and the fluidity of the molten metal to ensure complete mold filling.
- Flash: Excess thin layers of metal that escape from the mold cavity at the parting line or around ejector pins, requiring additional trimming operations. To solve the issue of flash in die casting, it's essential to increase the clamping force of the machine to ensure mold halves are tightly sealed, regularly inspect and maintain molds for damage or misalignment, and adjust injection parameters to optimal levels. Additionally, revising mold design for better venting and thermal balance, controlling the molten metal temperature, improving the gating system, implementing consistent process controls, and using appropriate release agents can effectively minimize or eliminate flash.
- Blisters: Blisters are a type of gas porosity that manifest as visible, raised bubbles on the surface of a component. They occur when air or gas, trapped at high pressure within the casting, expands and pushes the material outward after the casting is ejected from the mold. To rectify blisters, the same approach is used for internal gas porosity: minimizing trapped air. These solutions might include: altering the mold's cooling rate, tweaking water circulation, extending the cooling period, or quenching the part immediately after it's ejected from the mold. Adjusting the temperature of the alloy to decrease the thermal disparity between the mold and the metal is another effective strategy.
Is Pressure Die Casting Cost-Effective?
Yes. High-pressure die casting is especially cost-effective for high-production runs. This method enables the production of large volumes of parts quickly, often making it the most economical choice for high-volume production. The speed and accuracy of casting cycles lead to minimal waste and high efficiency, thereby decreasing the cost per unit over time.
How Eco-Friendly Is Pressure Die Casting?
Pressure die casting, while inherently energy-intensive due to the high temperatures required to melt metals, offers several eco-friendly aspects. It is highly material-efficient, producing minimal waste due to its ability to create near-net shapes and complex parts in a single process. The metals commonly used in die casting, such as aluminum and zinc, are highly recyclable, allowing for the reuse of scrap and excess materials without degradation of their properties. This recyclability significantly reduces the environmental impact associated with raw-material extraction and processing.
Is Pressure Die Casting Environmentally Friendly?
Yes, it is considered to be one of the more environmentally friendly methods in modern manufacturing. However, even so, it’s important to take into account that pressure die casting has both environmentally friendly aspects and areas in which its environmental impact is more significant. On the positive side, it is highly efficient in material usage, producing minimal waste due to its capability to create precise, near-net-shape parts that require less machining and finishing. The process also extensively uses recyclable non-ferrous metals like aluminum and zinc, which can be melted down and reused multiple times without losing their properties, thus reducing the need for new raw-material extraction and processing.
However, pressure die casting is energy-intensive, primarily due to the high temperatures required to melt metals, which can contribute to higher carbon emissions depending on the energy source. Additionally, the production process involves the use of lubricants and release agents, some of which may have environmental implications if not properly managed.
How Does Pressure Die Casting Compare to Other Forming Processes?
Pressure die casting stands out among other forming processes for its ability to produce high volumes of complex shapes with excellent dimensional accuracy and smooth surface finishes at a rapid pace. Unlike sand casting or investment casting, pressure die casting can achieve tighter tolerances and thinner walls, making it ideal for precision components. Compared to forging or machining, it reduces material waste and can be more cost-effective for large production runs, though it generally involves higher initial tooling costs.
Is High Pressure Die Casting Efficient?
Yes. High-pressure die casting is considered to be both efficient and economical.
What Are the Long-Term Implications of Pressure Die Casting in the Manufacturing Sector?
The long-term implications of pressure die casting in the manufacturing sector involve: increased automation, efficiency, and a push towards sustainability. As technology advances, this process continues to offer a pathway to producing high-quality, complex parts at scale, with significant material and efficiency benefits.
Is High Pressure Die Casting Safe To Use?
It depends. High-pressure die casting is generally safe when proper safety protocols and equipment are in place. The process involves handling molten metals and operating heavy machinery, which inherently carry risks such as: burns, exposure to harmful gases, and equipment-related injuries. However, adherence to rigorous safety standards, including the use of personal protective equipment (PPE), regular maintenance of machinery, and thorough training for operators, significantly mitigate these risks. With these precautions, high-pressure die casting can be performed safely.
What Are the Safety Considerations in Pressure Die Casting?
The safety considerations in pressure die casting are very important due to the inherent risks associated with handling molten metal and operating high-pressure machinery. Key safety measures include wearing appropriate PPE such as: heat-resistant gloves, face shields, and safety glasses to protect against burns, splashes, and flying debris. Proper ventilation is crucial to prevent exposure to harmful gases and fumes released during casting. Regular equipment maintenance and safety inspections are also essential to ensure machinery operates correctly and safely. Operators must be thoroughly trained in machine operation, emergency procedures, and hazard recognition to mitigate risks of accidents.
What Is the Difference Between Pressure Die Casting and Gravity Die Casting?
The key difference between pressure die casting and gravity die casting lies in how the molten metal is introduced into the mold. In gravity die casting, molten metal is poured into the mold from above and fills it under the force of gravity alone. In contrast, pressure die casting, including both LPDC and HPDC variants, involves forcing molten metal into the mold under pressure, ranging from 2 psi in LPDC to between 1,500 and 25,400 psi in HPDC, with the pressure maintained until the metal solidifies.
What Is the Difference Between Pressure Die Casting and Squeezing Die Casting?
The main difference between pressure die casting and squeeze casting lies in the method of introducing and solidifying the molten metal within the mold. Pressure die casting involves injecting molten metal into a mold under pressure, rapidly filling the mold cavities, and then maintaining pressure until the metal solidifies. In contrast, squeeze casting, also known as liquid metal forging, involves pouring molten metal into an open mold and then applying high pressure to the molten pool via a hydraulic press as it solidifies. This pressure is maintained during the entire solidification process, leading to denser, higher-quality castings with fewer porosities compared to traditional high-pressure die casting.
How Xometry Can Help
Xometry provides a wide range of manufacturing capabilities, including 3D printing, laser cutting, CNC machining, and even pressure die casting. If you’d like to find out more information about pressure die casting, or request an online quote, reach out to a Xometry representative today.
Disclaimer
The content appearing on this webpage is for informational purposes only. Xometry makes no representation or warranty of any kind, be it expressed or implied, as to the accuracy, completeness, or validity of the information. Any performance parameters, geometric tolerances, specific design features, quality and types of materials, or processes should not be inferred to represent what will be delivered by third-party suppliers or manufacturers through Xometry’s network. Buyers seeking quotes for parts are responsible for defining the specific requirements for those parts. Please refer to our terms and conditions for more information.